Hiking in the Drakensberg, South Africa: 9 Best Trails For Day Hikes


At a glance: The best Drakensberg hiking trails
You could also be interested in reading:
A word of warning: Baboon etiquette
3. Rainbow Gorge hike from Didima Camp near Cathedral Peak
4. Golden Gate NP: Wodehouse Peak Trail
5. Champagne Valley’s Breakfast Stream hike in the Drakensberg Mountains
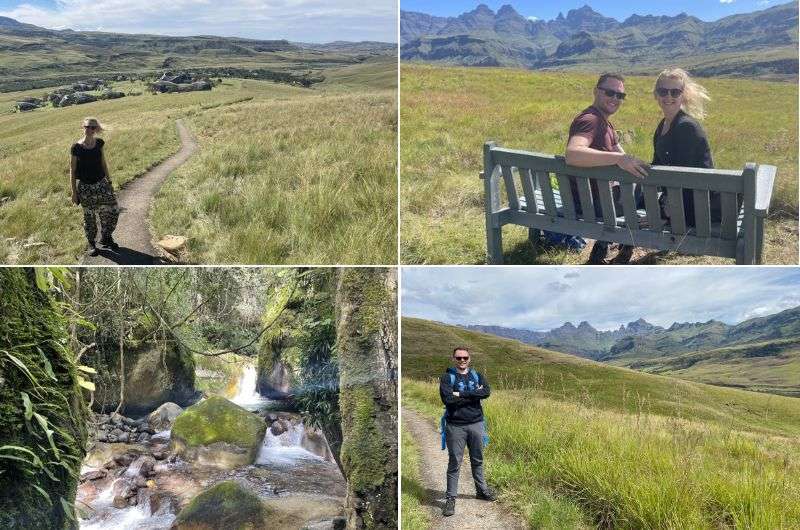
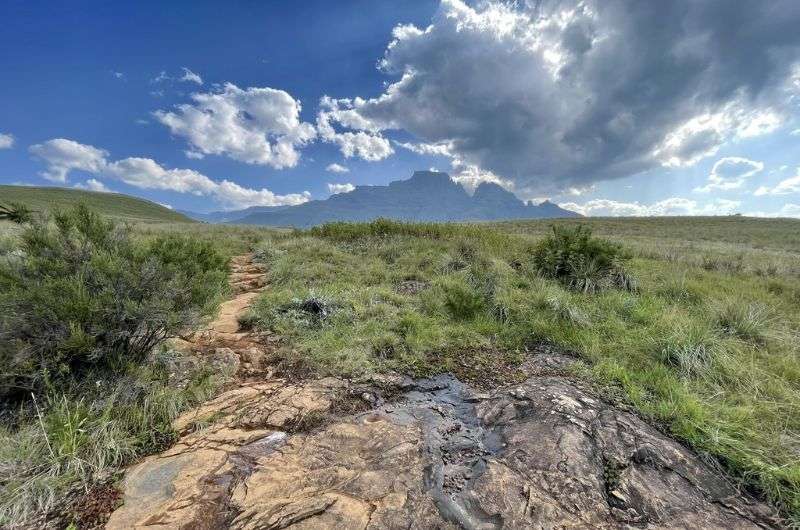
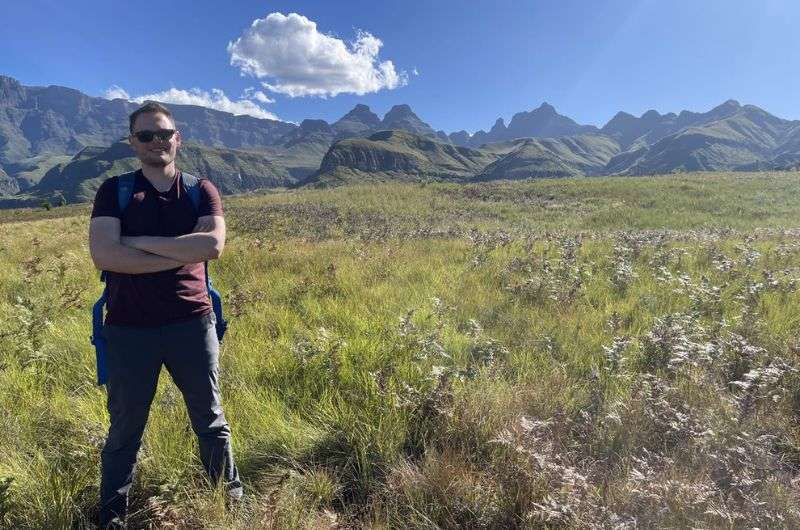
The rugged Drakensberg—namely Cathedral Peak and Royal Natal NP, is a place I've eagerly awaited to hike through in South Africa, especially for its legendary Drakensberg hiking trails. It’s one of the most dramatic mountain regions in the country.
And let me tell you, visiting during April, the prime time for hiking, was a pure stroke of genius on my end. The experience was nothing short of breathtaking for Drakensberg hiking, offering vistas that blend the charm of Scotland with the grandeur of US parks.
Drakensberg has a personality entirely its own, which makes it abso-frikin-lutely epic! Most of the hikes I cover below are located in the Northern Drakensberg, especially around Royal Natal National Park and Cathedral Peak.
The hiking trails are impeccably maintained, and the infrastructure is decent, providing a comfortable experience without breaking the bank.
The tourist traffic is just the right amount to give you a sense of safety without overwhelming the serenity—you’ll occasionally pass other hikers, but never enough to ruin the peaceful atmosphere of wilderness (you don’t want to be out in the boonies in South Africa all by yourself... read more of my safety tips and impressions).
However, a word of advice: while Drakensberg hiking trails are a hiker's paradise, trying to cover all of it in a single vacation might be a tad ambitious—especially if you’re also planning time in Cape Town or on safari. And by that I mean crazy and impossible.
But hey, no complaints here if you want to go all-in on a Drakensberg adventure! It's a place that leaves a mark on your soul. But unless you devout your entire hiking trip in Drakensberg, you’ll need to carefully choose which trails you’ll visit.
Read more from my South Africa travel blog.
Sometimes, all you need to do is take the first step... I've filtered out the best hotels in Bergville for you
Save it for yourself to come back to later, or share with your friends on social media!
I've already planned your ititnerary for the trip, complete with my travel tips.
Find more travel content, photos, and fun on:
At a glance: The best Drakensberg hiking trails
This hiking guide highlights the popular routes for Drakensberg hiking, showcasing what the Drakensberg offers to adventurous travelers in this iconic South African mountain range. Below is a quick overview of the top trails and what you can expect from each one.
- Tugela Falls hike: Chain ladders, Amphitheatre views, and access to one of the tallest waterfalls in the world.
- Tugela Gorge hike: Dramatic canyon scenery beneath the Amphitheatre cliffs.
- Rainbow Gorge from Didima Camp: Short forest walk with pools and Cathedral Peak views.
- Golden Gate NP: Wodehouse Peak Trail: Sandstone cliffs, wildlife sightings, and sweeping plateau panoramas.
- Champagne Valley hikes: Scenic valley views, steady climb, and optional summit extensions.
- Oribi Gorge: Hoopoe Falls: River gorge hiking with a waterfall finale.
- Baboon Rock: Steep scrambles and jaw-dropping Cathedral Peak vistas.
- Heyningen Pass: Forest trails, streams, and wide escarpment viewpoints.
- Battlefields:Rorke’s Drift, Isandlwana: Historic South African landscapes with cultural significance.
You could also be interested in reading:
- 2 Week + 3 Week South Africa Itineraries for Adventurous Travelers
- 23 Unpretentious Luxury Hotels in South Africa
- 30 FAQs and Tips for Planning Your Kruger Safari Visit
- 9 Epic Day Hikes on the Garden Route
- Cape Town Itineraries: Your Trip Plan for 3, 4, and 5 days
A word of warning: Baboon etiquette
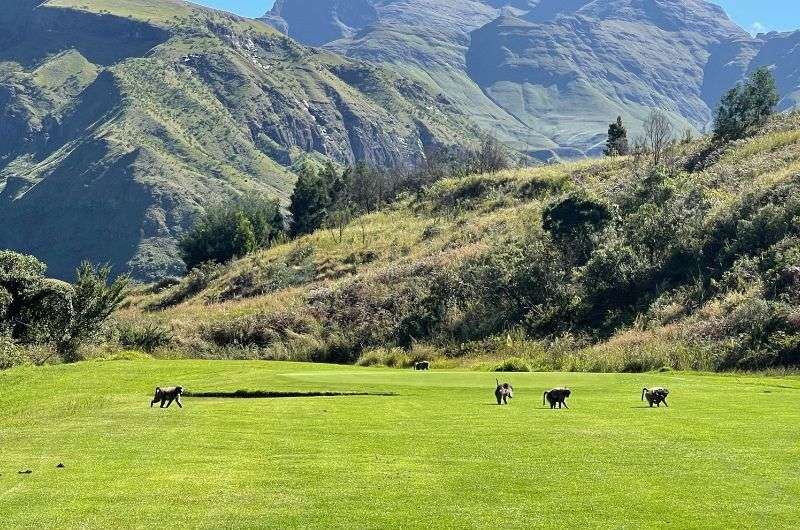
There they are—the devil baboons! Better keep your distance...
There’s a place called Baboon Rock which is one of the top Drakensberg hiking trails, but that certainly doesn’t mean that’s the only place you’ll encounter baboons. You’ll run into the big monkeys pretty often during Drakensberg hiking, so it’s good to know how to act when it happens.
Here are some basic rules of baboon encounters:
- Don’t pass through a group of baboons. The big boss giving you side eye? Yeah, he has sharp teeth and a temper. Stay away and either wait for them to move along, or find a different path if they’re blocking your way. You can stay back and make noise to give them a hint.
- Stand tall and look confident, but don’t threaten them. They have a short temper and might not appreciate your cockiness.
- But also don’t try to get friendly by smiling and staring at them! They’ll smile right back, and that’s not what you want. If there are baby baboons in the group, be extra careful not to piss any of the males off.
- Don’t walk around with food in your hand. They’ll take what they want, and they aren’t gentle about it. And obviously, don’t feed baboons. Duh.
Alright, now that you have a chance of making it out alive, let’s start hiking:
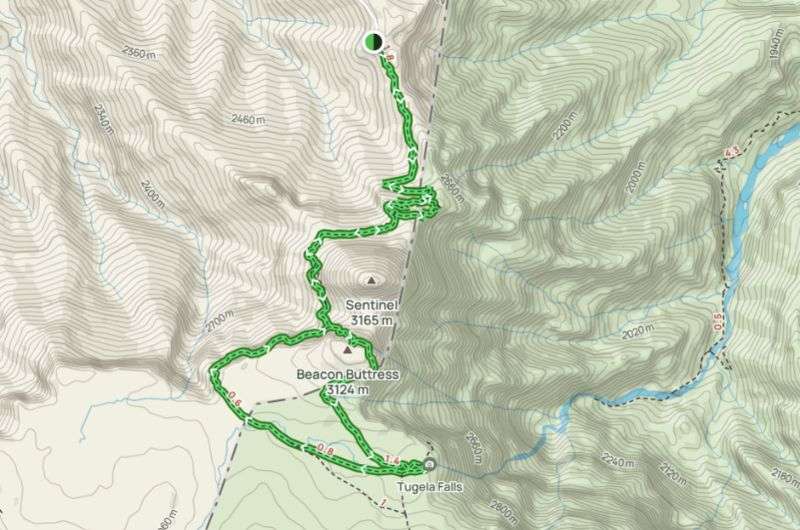
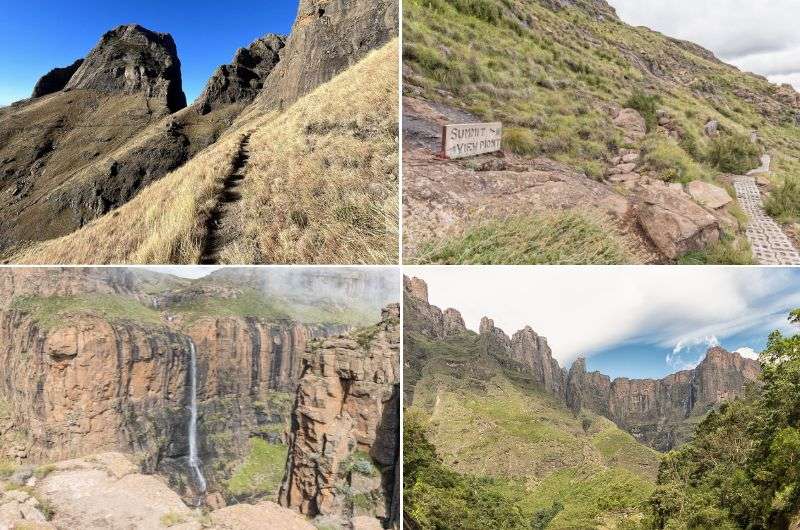
1. Hiking Tugela Falls

Use the chain ladders to get to the top of Tugela Falls. Yes, it’s a little scary, but this is classic hiking in the Drakensberg.
Hike length: 12 km (7.5 miles)
Elevation gain: 780 m (2,560 ft)
Difficulty level: Moderate to hard
Hiking time: About 5 hours
Parking and trailhead: Sentinel Car Park on Google Maps
This Tugela Falls hiking trail has mind-blowing scenery for Drakensberg hiking and is often referred to as the classic Amphitheatre—the ladders at the top are awesome.
It’s a must-do if you’re in Drakensberg and you want to do one of the top hikes there, plus, you may or may not make your way up the tallest waterfall in the world (see the fun fact below about the height controversy).
Tugela Falls is a challenging hike, but it’s not as bad as it might look from the reviews you see online (and maybe from the photos, too).
Note on water levels: Hike Tugela Falls in March or April, because that’s when you’ll get a good flow of water in the river that feeds the falls. People that have done the hike in September or October report no water at all in the waterfall!
Get full hike details @ Alltrails
Getting to Sentinel Car Park
The most awful part of the Tugela Falls hike is the drive to the trailhead at Sentinel Car Park. You should only attempt the drive yourself if you have a good 4x4 and you know what you’re doing and want to test your offroading skills. The road is extremely bumpy.
You’ll get a taste of what you’re in for before you reach Witsieshoek Mountain Lodge, and if you decide you can’t drive further, it’s ok, because most people don’t.
Witsieshoek Mountain Lodge can scratch that itch for you for ZAR 170—they have a shuttle taking hikers to the Sentinel Car Park and then back again. It’s a 30-minute drive from the lodge to the Sentinel Car Park.
Tugela Falls trail details
Most of the Tugela Falls hike is steady uphill climb with almost no suddenly steep sections. There are a few spots where you can venture off the path accidentally, so use a good map.
This hike has incredible views of the Amphitheatre, Devil’s Tooth, and the Inner Tower, but make sure to look where you’re going, too.
There are two ways to reach Tugela Falls in the final section: through the Beacon Buttress gully—often recommended only with experienced hikers or on guided hikes—,and then there are the chain ladders—and then there are the chain ladders.
The chain ladders are super cool, especially when you see people trying to muster up the last bits of courage if they’re prone to vertigo. It’s the kind of adventure that makes the climb unforgettable. You get to them in about 2 hours from the beginning of the hike.
They look a little sketchy, but seemed safe to me. I laughed the entire going up, because little extra bursts of excitement like this are what I live for.
The gully walk is a steep, narrow, and very rocky (requires scrambling) path and can be wet or full of ice unless you go smack in the middle of summer. Always check the weather forecast before attempting this section, as rain can make it significantly more challenging.
I passed. But if I didn’t, I’d rather go up it than down.
After the ladders, most of the way is pretty flat and you get to the waterfall in about 20 minutes. You’ll be walking right near the edge of the escarpment, with dramatic drop-offs reminding you just how high you’ve climbed.
Tugela Falls Sentinel Trail
Beware that you’ll be up in almost 3,000 m (9,800 ft), meaning your body could start experiencing some difficulty due to the altitude. From up here, you’re standing right on top of the Amphitheatre plateau.
You’ve read up on altitude sickness, right?
Tugela Falls height controversy: Boy, I got my brain in a bunch trying to solve the mystery of whether or not Tugela Falls is the tallest waterfall in the world.
Here are the details: Venezuela’s Angel Falls has been long regarded as the world’s tallest waterfall, but then you read that nobody knows where they measured it from way back in 1949.
Add the fact that neither Tugela or Angel is an uninterrupted plunge of water, and it gets too complicated to untangle. Has nobody properly defined “waterfall”?!
Anyway, a Czech expedition (shout out to my countrymen!) re-measured Tugela Falls in 2016, ending up with an impressive number: 983 m (3,225 ft)! Yep, that’s more than Angel Falls’ 979 m (3,212 ft).
So, Tugela Falls is actually the tallest waterfall in the world, but it consists of 5 individual tiers of falling water, the longest one being just around 400 m (1,300 ft). Angel Falls has the highest uninterrupted water drop at around 800 m (2,624 ft). You be the judge.
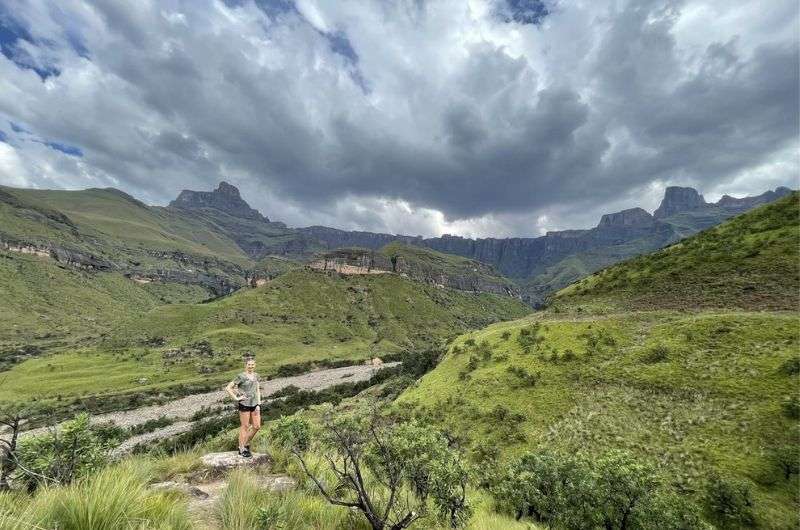
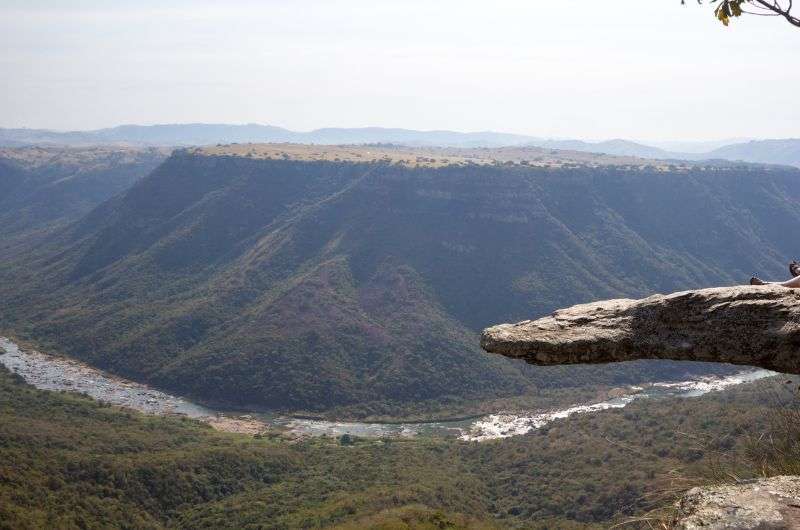
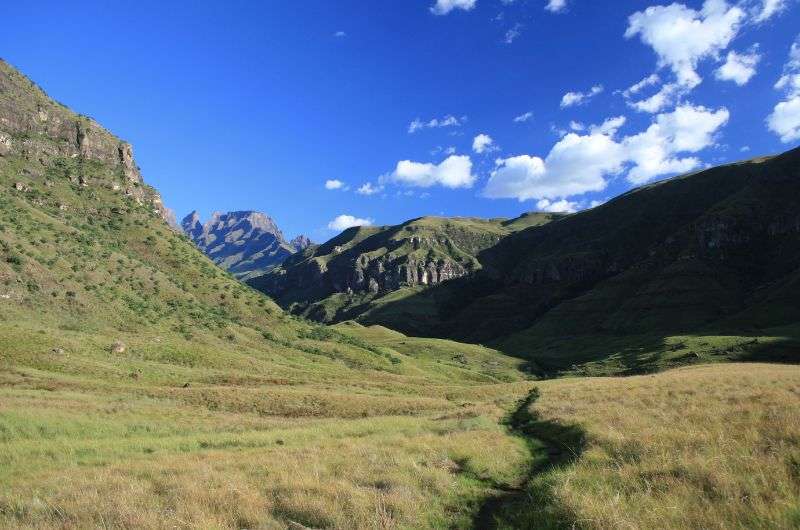
2. Tugela Gorge hike
Tugela Gorge, here we come!
Hike length: 14.8 km (9 miles)
Elevation gain: 350–400 m (1,148–1,312 ft)
Difficulty level: Moderate to hard
Hiking time: 4 hours
Parking and trailhead: Near Thendele Camp, see it on Google Maps
We went on the Tugela Gorge hike in April 2023, when the end of this hike had been claimed by a landslide some time before, making it inaccessible. No adventuring on ladders for us, which also means you can’t get the best view of Tugela Falls, either. Boo.
Still, Tugela Gorge will have you feeling tiny and being awed by the incredible views of the surrounding the Drakensberg mountains, and the mighty Amphitheater (a rock cliff three times the size of El Capitan in Yosemite!). It’s very much worth it even without the last bit that you’d need to climb the ladder for.
Don’t forget your sunscreen, since you'll be hiking at an altitude of over 1500 m above sea level and the sun will get you! The weather in this part of the Drakensberg can shift quickly from blazing sun to sudden cloud cover. Trust me; we learned that lesson the hard way.
Even in April, the temperatures can soar up to 25°C, so be prepared.
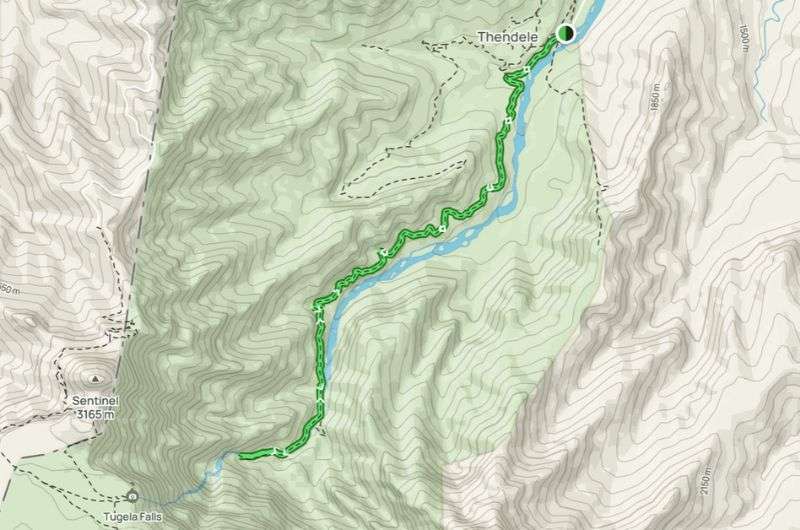
This map shows the full hike, but the end is now inaccessible (map from Alltrails)
Parking at the Tugela Gorge trailhead
The convenience is unbeatable, with parking right at the trailhead to the Tugela Gorge situated close to Thendele Camp. Here’s a link to it on Google Maps. It’s easy to find and you start your hike right at your car. Sign in and pay the trekking fee there.
Tugela Gorge trail details
You'll work your ass off on this hike, but the views are worth it
Prepare to be enchanted right from the start of the Tugela Gorge hike in the Drakensberg. As you set out, the magnificent views of the Amphitheater will already have you in awe. The initial 2 km take you through a semi-jungle, providing an easy and pleasant pathway.
But brace yourself for a little rockiness as you approach the gorge.
Once you cross the wooden bridge, the real magic unfolds. The towering cliffs of the Amphitheatre begin to dominate the skyline ahead. Those views towards the gorge are nothing short of spectacular.
Just keep in mind that unless you're Superman, you won't get past the "path closed" sign due to a massive landslide. Safety first, folks! You’ll have to skip the excitement of the ladder at the end until the place is repaired.
One thing to note is that you won't find many resting spots along the way, but worry not; the path is well-trodden and safe. It took us about 4 hours there and back total— making it an easy addition to any Drakensberg trip.
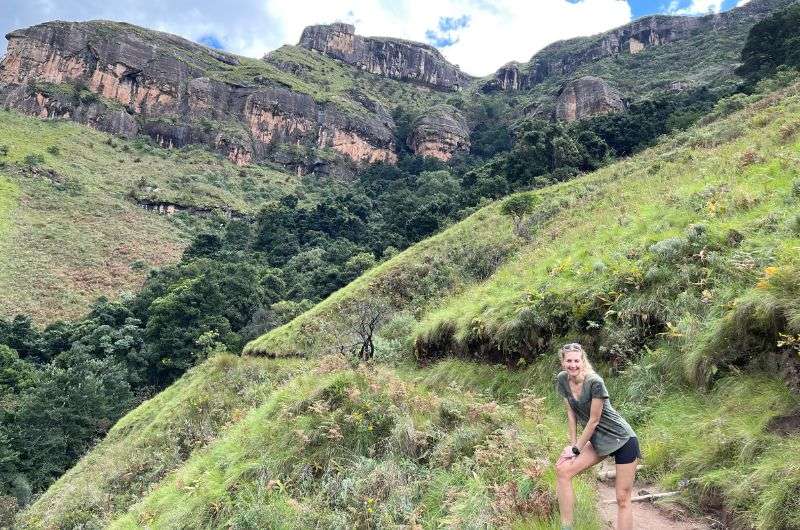
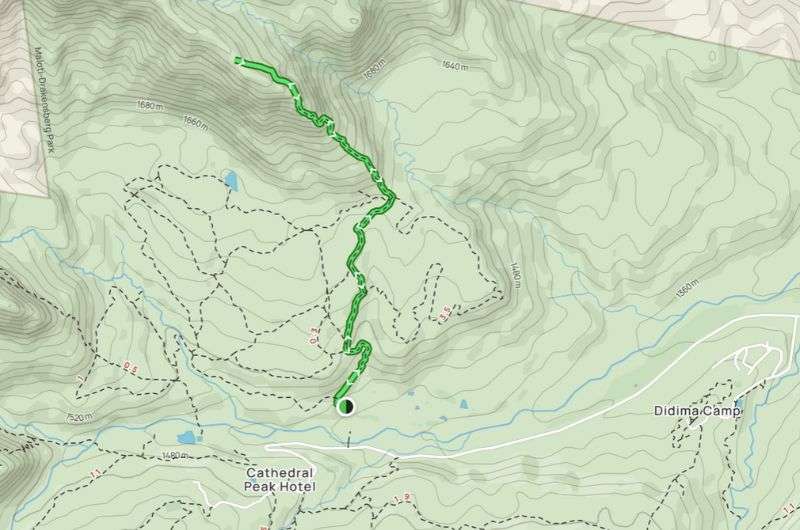
3. Rainbow Gorge hike from Didima Camp near Cathedral Peak
Rainbow Gorge—you don't have to walk through the jungle to earn this view
Hike length: 5.6 km (3.5 miles)
Elevation gain: 200 m (560 ft)
Difficulty level: Easy to moderate
Hiking time: 2 hours
Parking and trailhead: Didima Camp, see it on Google Maps
The Rainbow Gorge hike knocks your hiking shoes off right from the start, and while it’s not the classic Amphitheatre hike, the views of Cathedral Peak and the surrounding mountains are just as impressive. Another plus for Drakensberg hiking? Low grass! That’s a huge bonus since it’s much less annoying than the higher vegetation we ran into everywhere else in the Drakensberg.
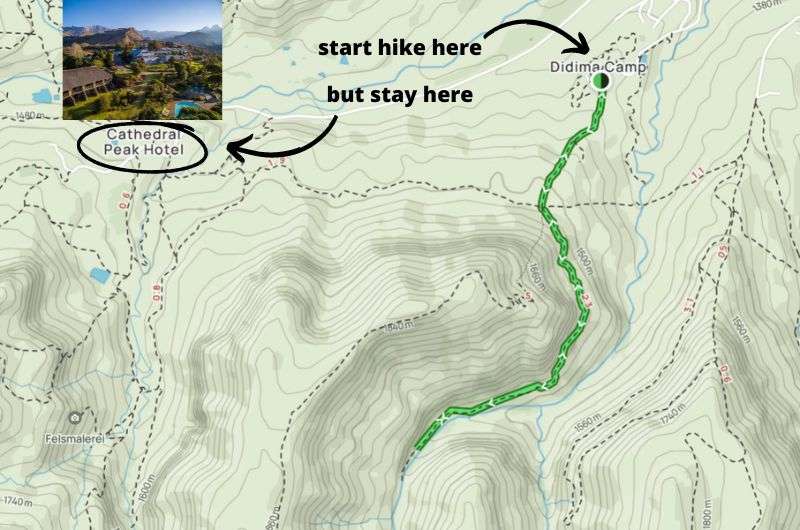
The hike starts at Didima Camp (see it on Alltrails), but I strongly urge you to stay at Cathedral Peak Hotel a well-known mountain resort in the Drakensberg.
Finding the Rainbow Gorge trailhead
You set off on the hike right from the Didima Camp Cathedral Peak where you can park your car. Easy peasy.
Rainbow Gorge trail details
The Rainbow Gorge hike was quite easy
I’d say the Rainbow Gorge hike is easy, but I guess the steeper section in the beginning could make it moderate for some people. But after the first kilometer or so, it’s flatter than the Serengeti after the wildebeest migration.
You probably won’t even notice the incline, though, because the views of Cathedral Peak are beyond believable.
Then, you walk through the gorge, and finish up by the pools at the end after walking through the forest in this quieter corner of the Drakensberg. It gets humid under the treetops, so you can expect a mildly slippery and wet ground.
Dip your toes in the pools, have a picnic, and then head back the same way.
All in all, about 2 hours including a little stop at the end, making it perfect for a relaxed afternoon hike..
Tip: I was thoroughly impressed by this part of the Drakensberg, and next time I’d easily spend 5–7 days just exploring the area. There is so much to see and do! If you book yourself into the Cathedral Peak Hotel you don’t even need to leave the grounds for the first couple of days.
There’s also a golf course (with those views!!), tennis court, a wellness center, and more. Like horseback tours for those that, unlike me, don’t have horse allergies. The Baboon Rock hike, next on this list, starts there as well.
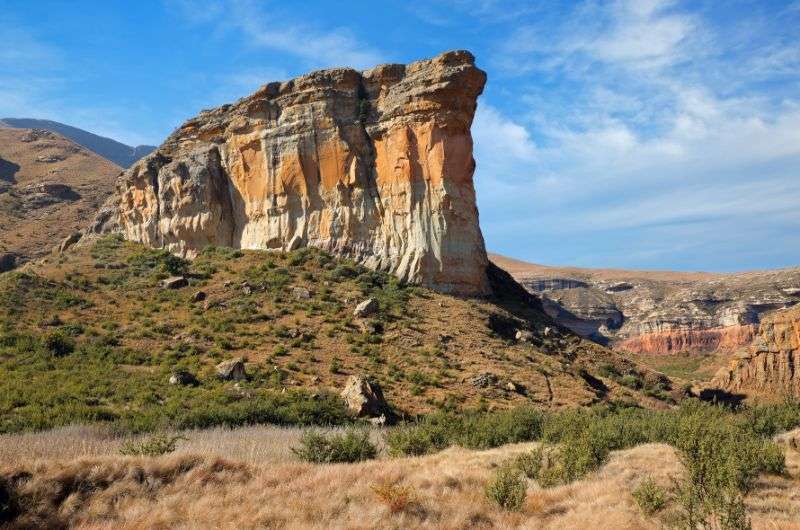
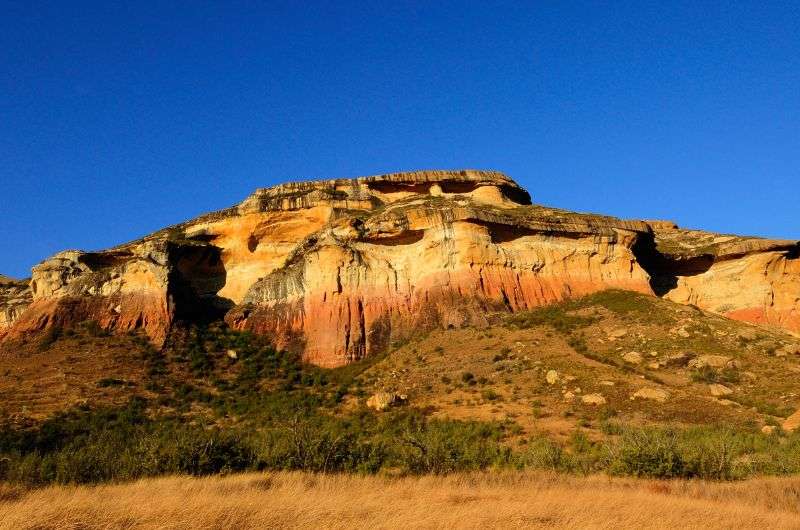
4. Golden Gate NP: Wodehouse Peak Trail
Golden Gate National Park
Hike length: 9 km (5.6 miles)
Elevation gain: 690 m (2260 ft)
Difficulty level: Hard
Hiking time: 4 hours
Parking and trailhead: At the Total gas station in Glen Reenen—see it on Google Maps
There are several hikes in the Golden Gate National Park, like the short and sweet Brandwag Buttress route, but we’re going to take on something a little more challenging. And by a little, I mean a lot—the mother of all Golden Gate trails, Wodehouse Peak trail!
(You can also make a short detour to Doreen Falls, a small but scenic waterfall tucked into the sandstone cliffs.)
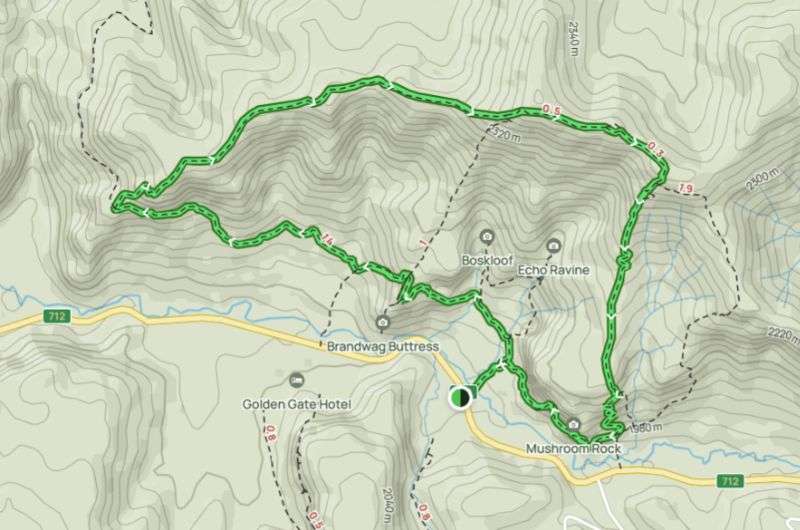
Do the Wodehouse Peak Trail in the opposite direction than showed here! Alltrails map
Start the Wodehouse Peak trail via Mushroom Rock
The signs and the Alltrails map will lead you to believe that the Wodehouse Peak trail goes clockwise. But you’re going to trust me instead and go in the opposite direction—starting with the steep and tricky incline to Mushroom Rock. Because unless you have knees of steel, you don’t want this section to be at the very end of an already challenging hike.
Wodehouse Peak trail details
The Wodehouse Peak Trails is challenging but so amazing!
The Wodehouse Peak Trail is a rewarding and slightly challenging hike due to the constant up and down and winding path. But all is forgotten when you reach the top and get those views across Drakensberg hiking trails! Holy wowzers!
As if the towering Drakensberg Mountains weren’t enough reason to hike this path, you will probably get bonuses in the form of wildlife sightings, too! Wildebeest are almost a given, but we even spotted a glimpse of some zebras in the distance! Few places in the country combine wildlife and mountain scenery quite like this.
And then some other animals that we have no idea what their names are. Take binoculars if you want to make out more than some fuzzy blobs.
The trail is pretty easy to follow, but I strongly recommend downloading an offline map so you don’t wander the Golden Gate NP until the end of time.
It can also get very windy up there, and you will have no place to hide from the sun, so take this hike seriously and pack accordingly. Don’t forget to take enough water!
The panoramic views are truly incredible, and you’ll quickly forget about your complaining legs each and every time you look up across the wider Drakensberg landscape. What a treat!
Drakensberg accommodation tip: Dalmore Guest Farm
Picture this: a slice of paradise tucked away from the world, that's Dalmore Guest Farm. While it’s not a large commercial resort, it offers a peaceful countryside alternative after long hiking days.
You're greeted by nature in all its glory, with trees standing sentry over the scene. The manager was an absolute gem and ensured we were pampered just right.
There’s a kid’s play areas, a cool pool, and those fireside braais where you can cook your own dinner, making for unforgettable evenings.
Don’t be put off on the road to Dalmore Guest Farm—that tar road leading in might have you thinking "are we there yet?!" Trust me, it's so worth it.
Oh, and the food! Brace yourself for a three-course extravaganza that'll make your taste buds do a happy dance. I'm talking top-notch, finger-licking goodness. After a long day in the mountains, sitting down for dinner here feels especially well earned.
And as the day winds down, the evening fireplace sets the mood for pure romance. It’s the kind of place where you’re happy to spend the night after a long day on the trails.
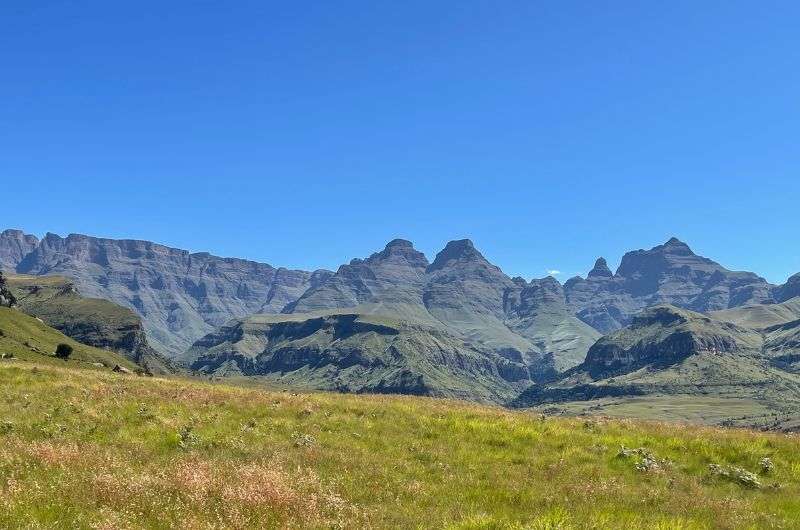
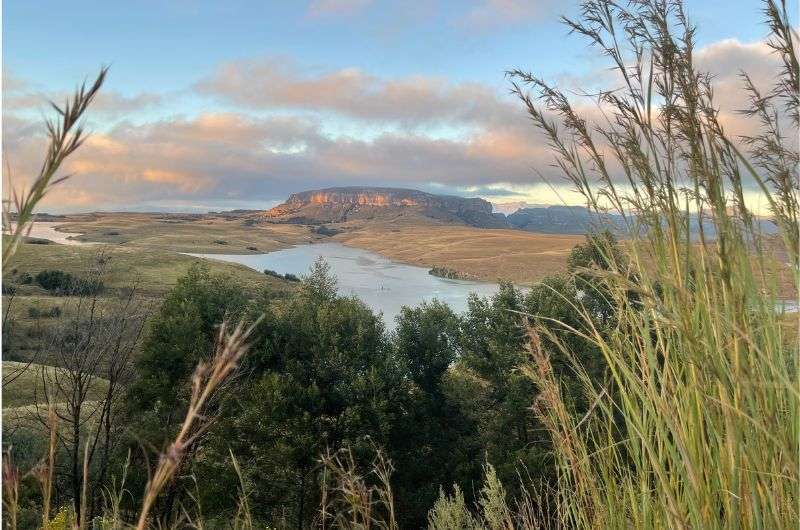
5. Champagne Valley’s Breakfast Stream hike in the Drakensberg Mountains
The view from the path towards Sterkhorn... if you feel especially energized, you could make it all the way to the top of it! (see trail extension below)
Hike length: 6.6 km (4 miles)
Elevation gain: 530 m (1740 ft)
Difficulty level: Moderate
Hiking time: 3 hours
Parking and trailhead: Monk’s Cowl Campsite—see it on Google Maps
This is a fantastic hike in Champagne Valley. I would’ve loved to hike all the way to Champagne Castle, but that would require overnighting in impromptu camps with tents and sleeping bags on the way, and that’s not my thing. Instead, I opted for this gorgeous hike that’s a perfect way to start the morning (hence the name!).
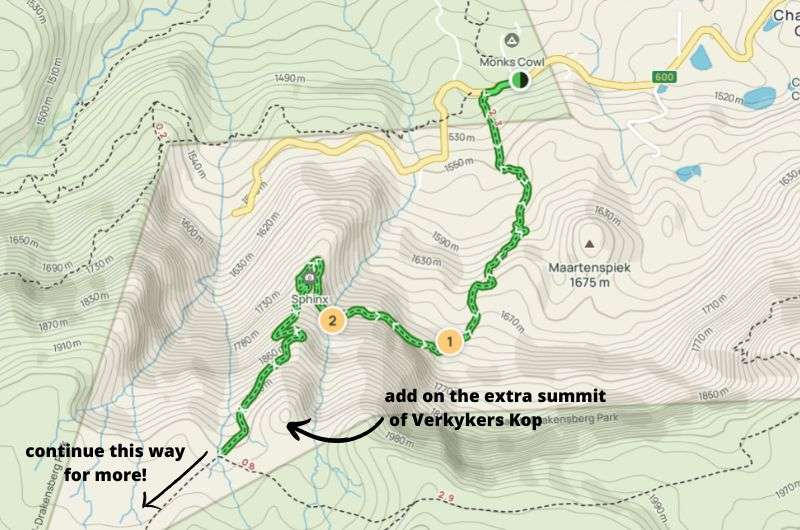
Get this map and route details on Alltrails
Popular routes to extend your hike
The world is your oyster at Champagne Valley, and you can easily add on more kms to this hike if you feel like it. You could include Keartland’s Pass and Blind Man's Corner and turn it into a 12-km (7.5 mi) loop hike, or, if you’re a real animal, summit Sterkhorn in what is one of the most challenging and most rewarding hikes in the South African Drakensberg, and a route mayn people prefer to tackle on guided hikes.
I am still kicking myself for not having time for this one... I’m putting it on my “see you next time” list. See the Sterkhorn hike details on Alltrails.
Whining aside, the Breakfast Stream hike delivered on the views front. On clear days, you can spot the dramatic slopes of Champagne Castle rising above the surrounding peaks.
Breakfast Stream hike trail details
Georgeous views of the Monk’s Cowl range
The beginning of this trail is at the Monk’s Cowl campsite, where you sign yourself in and pay a small fee at the booth and head off. If you’re staying overnight at the campsite, you can cook your own meals there before heading out the next morning.
The trail is well-marked and easy to follow, leaving you more time to enjoy your surroundings. Maybe pack a coffee and have that in the first 30 minutes of the trail, since it leads through the forest and there are no views to speak of.
Then, pack away the caffeine and whip out the camera, because the views start and don’t let go for the rest of the hike! It’s pretty much a steady climb until you reach the Breakfast Stream.
You’ll be walking along a dirt path, lots of time on the slope of the hill, but never anything too serious to worry about vertigo. Then you’ll pass Crystal Falls, and then the cool rock formation of the Sphinx.
For a relatively short and easy hike, it packs a lot of punch! If you do have time for more, I urge you to consider the extensions I mention above.
And if you do end up at the summit of Sterkhorn, let me know in the comments! I have FOMO as is, so I want to at least know that it’s substantiated.
Tip: Right before you reach the stream, you can go an extra 15 minutes up a trail that leads to Verkykers Kop for some more epic views.
6. Oribi Gorge: Hoopoe Falls
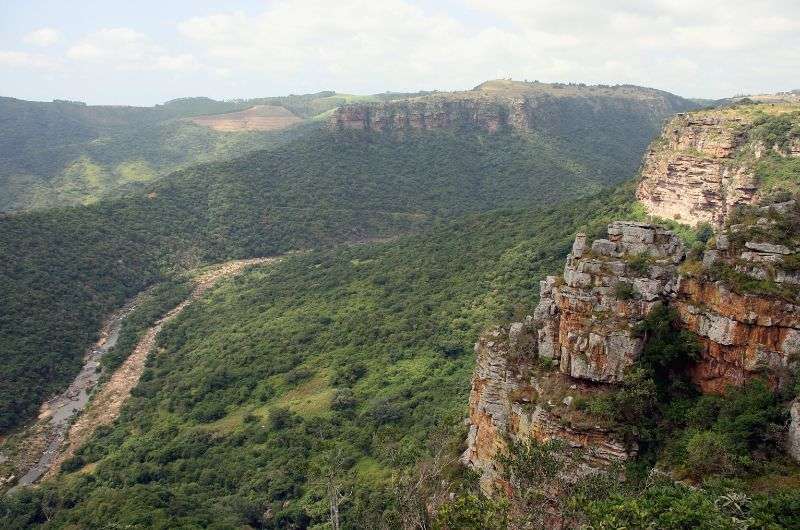
Oribi Gorge
Hike length: 8.5 km (5.3 miles)
Elevation gain: 400 m (1300 ft)
Difficulty level: Easy to slightly moderate
Hiking time: 2.5 hours
Parking and trailhead: Oribi Gorge car park—see it on Google Maps
A leisurely hike along a pretty river that ends with a waterfall. What’s not to like?
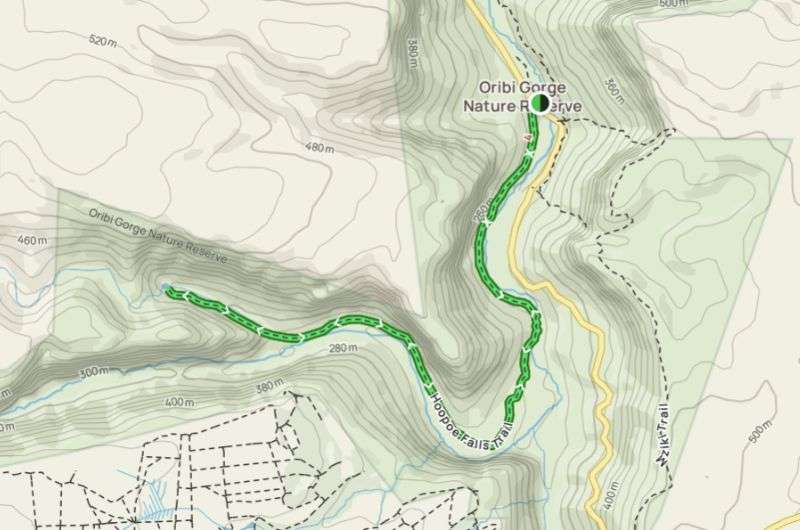
The Oribi Gorge hike I describe here is an out-and-back route, see details on Alltrails
Other Oribi Gorge hiking options
If you want to hike Oribi Gorge but don’t have the time or will to put in more than an hour, you’re in luck. There’s a trail that leads in the opposite direction from the Hoopoe Falls trail that’s just 2.5 km (1.5 mi) long. You’ll still get a taste of the gorge and you’ll be done within an hour!
Hoopoe Falls trail details
Look at the views across the Drakensberg hiking trails
The Hoopoe Falls trail is clearly marked, but that doesn’t mean it’s always easy to follow!
To explain: it’s hard to get lost since you’re always following the river, but there are a couple of steep rocky areas that are a little more difficult to make your way, but totally doable unless you are a total couch potato.
If you visit after rainfall, you’ll be rewarded with a great waterfall at the end of this hike, and you can even take a swim in the pool under it. If it’s dry days, it may not be as fabulous.
A positive aspect of hiking in the river gorge is that you’ll get plenty of shade, which, in the South African heat, can be a life saver. No matter what the weather is when you set out, always come prepared with some waterproof layers.
7. Baboon Rock hike
On the Baboon Rock hike, you’ll get jaw-dropping views straight from the beginning—this is what hiking in the Drakensberg is all about.
Hike length: 8 km (5 miles)
Elevation gain: 500 m (1640 ft)
Difficulty level: Moderate to hard
Hiking time: 4 hours with lots of photo stops
Parking and trailhead: Cathedral Peak Hotel golf house—see it on Google Maps
Baboon Rock delivers stunning views and a epic trail. I’d say you need to be at least moderately fit to manage to get all the way to the top of Baboon Rock.
While it’s not high in technical difficulty, you’ll still need to handle a good amount of physical effort and some steep scrambling sections. it’s not easy minding your step and constantly picking up your jaw off the ground.
The Baboon Rock hike is out-and-back and starts at the Cathedral Peak Hotel’s golf course (map from Alltrails)
Choose your starting point wisely
People start this hike right at Cathedral Peak Hotel, but I strongly suggest making your way all the way to the golf house and skip the first 1.5 km (1 mi) or so section, not only to save your energy, but because of the epically high shrubbery you’d need to walk through.
You’ll already see why this hike is called Baboon Rock, the giveaway starts right at the golf course where you’ll see the feisty local players. Keep your eye on them, they don’t seem too friendly in real life! (You all know I’m talking about baboons, right?)
Cathedral Peak from the Baboon Rock trail
Baboon Rock trail details
There are spectacular views the entire way on this hike, but the further along you are, the better it all gets... that’s if you like your trails steep and full of scrambles! On a clear day, you can even make out the distant Amphitheatre stretching along the escarpment.
The first part of the hike is fairly flat, and the second half, as you make your way up Baboon Rock, is steep and superb!
Flat or not, I’m not lying when I say the views are incredible.
Those of you that are prone to vertigo will need to remember to not look down in some sections of the final ascent, because you’ll be able to imagine just how easy it would be to tumble down. In a few spots, the path runs close to the rocky edge, which adds to the thrill of the ascent.
Still, I think this climb is very fun and very rewarding for everyone.
All in all, a fantastic short hike.

Satisfied, I leave for the hotel after a pleasant Baboon Rock hike
8. Hike to Van Heyningen’s Pass viewpoint

Van Heynigan’s Pass visible from Injisuthi... it looks worse than it is
Hike length: 8 km (5 miles)
Elevation gain: 400 m (1000 ft)
Difficulty level: Easy
Hiking time: 3.5 hours
Parking and trailhead: Injisuthi Camp —see it on Google Maps
Ready for some magical forests and fantastic Drakensberg peak views? The hike to Van Heyningen’s Pass is a great Drakensberg hiking option for when you want something not too strenuous, like when you have ADHD but can’t stay still, so you hike on your rest days anyway.
Pre-hike formalities
Before you set off on this hike, you’ll fill in the registration papers at Injisuthi Camp. You know, in case you get lost and they have to come looking for you.
This is standard procedure at many of South Africa’s trekking spots, so take a minute and give enough details to make rescue’s job easier if they need to save your ass. Better be safe than sorry, right?
That said, this hike is pretty straightforward and I can’t imagine you needing to be escorted out. One thing to keep in mind is that this is the Drakensberg and the weather here has a mind of its own—always go on your hikes prepared for the hot and cold and wet.
Even in summer, temperatures can drop quickly at night in the higher elevations. A sudden hail storm can turn this shortish hike into an ordeal, fast. Mountain weather changes rapidly here, so layering up is always a smart move.
Van Heyningen’s Pass trail details
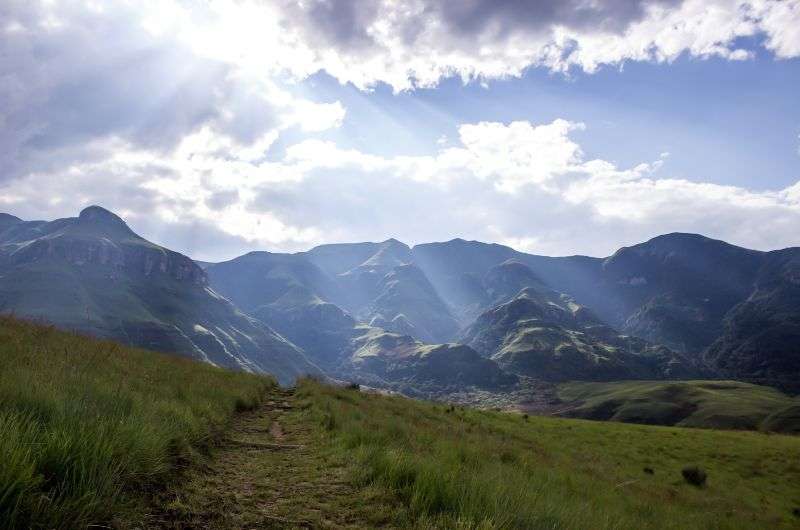
If it weren’t for the climb up to the pass, this hike would be a magical walk through fairytale surroundings. It’s one of those paths where you truly feel the scale and quiet of the Drakensberg wilderness.
Picture yourself hopping over streams, prancing among the wildflowers, and then weaving your way among the trees, only to end up on top of the mountain, taking in the dramatic views all around you.
This way from Injisuthi Camp!
Or, as I would describe it: it’s a nice walk. Great for a rest day, easy peasy.
For the first 30 minutes or so, you’ll be following the stream, passing over some small wooden bridges along this scenic route.
Then, it’s all about the flowers and trees, all the while the mountains start rising around you. Oh, and also baboons. They are everywhere.
You’ll walk through the narrow, rocky path up through the forest next. Beware that all this humidity and shade means one thing: everything is slippery!
And finally, you’ll hike up the narrow gorge, passing all kinds of rock formations, until you finally reach the top where the views open up across the rolling Drakensberg peaks. It’s a quieter kind of adventure, but no less rewarding.
9. Battlefields hike: from Rorke’s Drift to Isandlwana
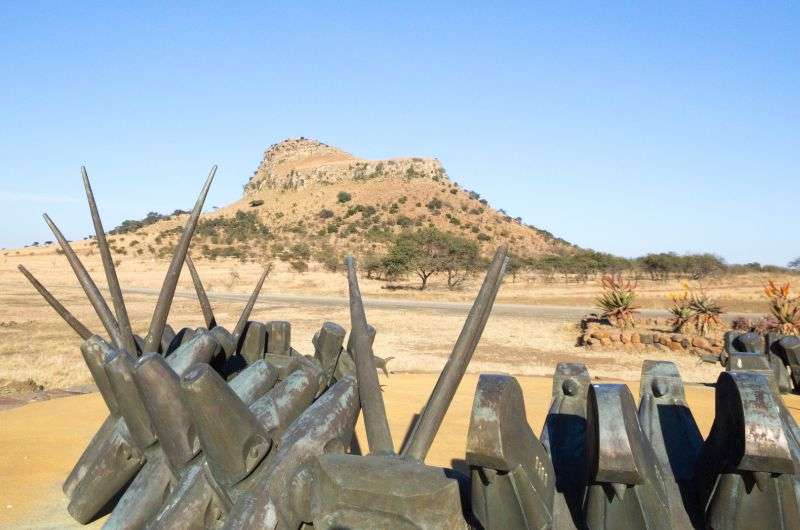
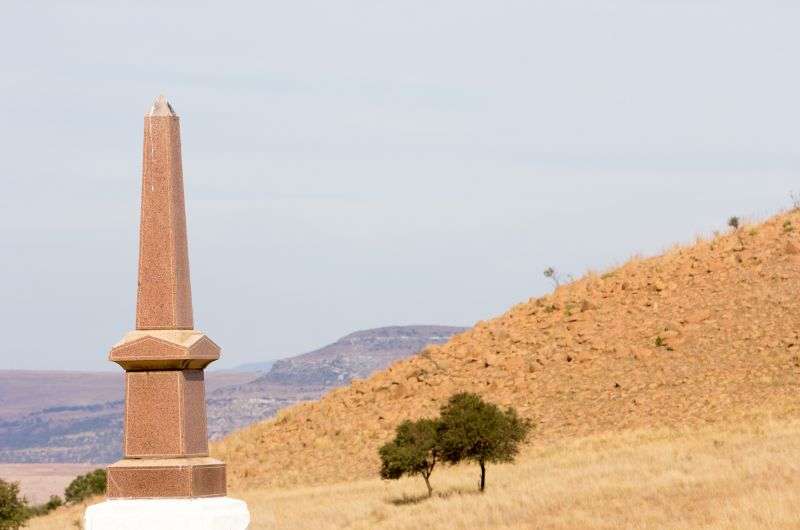
The memorial at the Isandlwana battlefield
Hike length: 10 km (6 miles)
Elevation gain: almost none
Difficulty level: Easy
Hiking time: 3 hours
Parking and trailhead: Rorke’s Drift Museum—see it on Google Maps
There are many ways to explore the Battlefields—the sites in KwaZulu-Natal where significant battles and conflicts took place. You can walk on the same ground where Zulu warriors, British troops, Boer soldiers, and other forces once stood and battled it out.
All of this unfolds against the distant backdrop of the Drakensberg Mountains.
Quite amazing to imagine when you’re standing there, looking at the graves of soldiers covered by white stones. These events shaped the history of the country in profound ways.
How you can see the Drakensberg Battlefields
Several companies offer multi-day Battlefields tours that covers several historical sites, museums, and guided hikes. But that’s not what you’re here for.
You can very well explore the area on your own, but arm yourself with some proper knowledge beforehand so you know what you’re looking at.
If you’re walking around, you’ll need to use a lot of imagination to be able to picture the historical happenings on the now calm and uneventful land.
Recommended Battlefield’s walking route & guided hikes
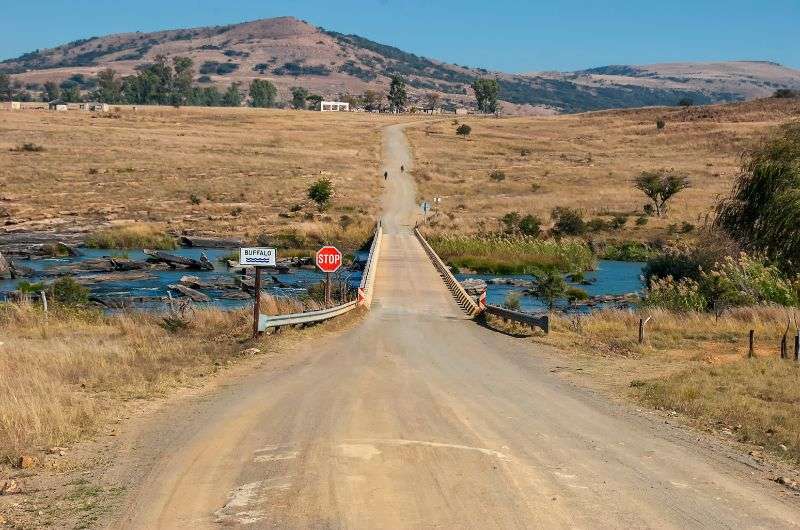
River crossing near Rorke’s Drift
If you want to do a self-guided day trip and hike it out on your own, I suggest this:
Walk between Rorke’s Drift and the Isandlwana Battlefield, where, if you actually learn about the incredible battles there, you’ll find yourself in places with entirely opposite scripts.
Rorke's Drift is a small battlefield site that holds immense historical significance. It was the location of a remarkable defense by a small contingent of British soldiers against a large force of Zulu warriors during the Anglo-Zulu War in 1879.
I mean 150 British against thousands of Zulu, wow!
At Isandlwana, on the other hand, a well-equipped British force suffered a humiliating defeat at the hands of “primitive” Zulu warriors. The unpredictable complexities of warfare, huh?
The hike—more a walk, since it’s entirely flat—from one battlefield to the other is roughly 3 hours long and takes you across the river, through fields, past the new road, and to Isandlwana hill. There, you’ll see the scattered cairns where the defeated British soldiers lay.
You’ll be following a sometimes invisible trail (the old bridle path), but we had no trouble recruiting the locals a couple of times as our human GPS.
You may even get your own entourage of kids here or there. You can’t really get lost, because you can see Isandlwana in the distance the entire way, so just point and walk, and you should be good.
There’s a museum at both Isandlwana and Rorke’s Drift if you’re into some more fascinating history, as well as several monuments that Google Maps will gladly unveil to you.
Once at Isandlwana, you’ll need to either backtrack to the starting point, or figure out a different route to make it into a circuit.
Or, hint hint, get yourself a ride back to Rorke’s Drift. This Battlefield’s hike is pretty and historically significant, but you don’t really need to see the same thing twice.
Sometimes, all you need to do is take the first step... I've filtered out the best hotels in Bergville for you
Save it for yourself to come back to later, or share with your friends on social media!
I've already planned your ititnerary for the trip, complete with my travel tips.
Find more travel content, photos, and fun on:
This post contains affiliate links. If you make a booking through one of my links, I may earn a small commission—at no additional cost to you. Thank you for your support!
At a glance: The best Drakensberg hiking trails
You could also be interested in reading:
A word of warning: Baboon etiquette
3. Rainbow Gorge hike from Didima Camp near Cathedral Peak
4. Golden Gate NP: Wodehouse Peak Trail
5. Champagne Valley’s Breakfast Stream hike in the Drakensberg Mountains


Comments | Thoughts? Give us a shout!